Showing posts with label China Glaze. Show all posts

Sunday, 20 April 2014

FingerFood's Theme Weeks - Gothic

Another week, another FingerFood theme! This is a manicure that I did, photographed, removed, thought it was ugly... but when I came back to the photos now, I actually like it! Which is good, since I don't have time to do any other manicure for this challenge!


Polishes used: Nails Inc Little Chester Street, Maybelline Woven Skyline, OPI Off With Her Red, Jess Rock Chick, China Glaze Ravishing, Dahling, Color Club Red Velvet, Nails Inc Burton Mews and Barry M Superdrug LE2013.

As you can see I went overboard with the number of polishes used - and because of my limited time, I can't really explain in detail how I did it.

Gothic manicure - roses, jelly and glitter!


I basically used the different glitters, and the red jelly to create the plainer nails, and painted roses on the middle finger with an assortment of red and green polishes.

Glitter under jelly is one of my favourite things.
Thanks for looking, and check out other manicures below!


Sunday, 13 April 2014

FingerFood's Theme Weeks - Fishtail

This week's theme is a technique I had never tried before - a fishtail braid. This is why I love challenges - they make me attempt things I'd never dare without the prompt!

Polishes used: China Glaze Spontaneous, Jess Disco Diva, my own franken, Misa Sorry Just Can't Help It and Star Gazer 232
I started with the plainer nails, and did the actual fishtail a day later. The base colour is one of my own franken-polishes - I had a bottle of very runny silver microglitter polish (which came with a striping brush, completely unsuited to the polish), and I poured it into a larger bottle and added some purple and grey polish until I got the colour I wanted. I may still tweak it in the future, but right now it's a lovely dusty lavender with insane amounts of silver microglitter and two coat coverage. Once this was dry, I added a glitter gradient of Jess Disco Diva on the tips. The effect screamed Disney princess to me :D

Fishtail braid manicure with a franken-polish of my own
The next day I sat down with a podcast, and started the time consuming process of painting the braid. Seriously, I had to wait for each individual stripe to dry - it took me at least 30 minutes in total. I picked out three polishes that would compliment the base - two purples and a silver foil - and followed the tutorial by the amazing Lucy from Lucy's Stash. It took me a while to figure out the best brush to use for this - the bottle brushes were too big, the detail brush too small, and in the end I went with a striping brush. Once the whole thing was dry, I secured it with Color Club top coat.

Glitter and fishtail braid.
As you can see, the fishtail is not very neat, and leans off-centre. However, I am quite happy with it - it was my first go at this technique. The polishes I chose were perfect for the job, opaque and easily applied, and the striping brush worked well. I will probably use this technique again in the future, but only as an accent nail - I don't think I have the patience to do an entire hand!

Polishes I used:
  • China Glaze Spontaneous - an almost pastel medium purple crème, nicely opaque (two coats alone) and very easy to apply.
  • Jess Disco Diva - a mix of two sizes of purple and holographic glitter in a clear base. Swatched here.
  • Misa Sorry Just Can't Help It - a darker saturated purple crème, excellent for nail art and nearly a one coater on its own. 
  • Star Gazer 232 - incredibly opaque silver foil, perfect for all nail art purposes.
  • My own franken - so far nameless, and obviously unique!


Thanks for looking, and check out other challenge manicures below!

Tuesday, 11 March 2014

Tri-Polish Tuesdays - March round two!

Polishes used: Nails Inc York Street and Wardour Street, Claire's Shiver and China Glaze Highlight of my Summer (not shown - Stargazer 232).
This week's challenge manicure is clear evidence that reality smashes the best laid out plans. In my manicure planner I had sketched out a beautiful skittle manicure with water marble accent nail - and yesterday evening I sat down to my first ever session of water marbling. Guess how that turned out? I attempted the marble maybe 10 times, but it just wasn't really going anywhere; all I was achieving was a complete mess on my finger and a waste of perfectly good nail polish. In the end, I decided to give it a rest and had to improvise something new today.

Skittle, glitter and stamping - a very spring themed manicure


Since the sun was out again, I felt drawn to the neons and pastels in my stash, and chose three complimenting polishes - lavender, neon mint and light dusty blue. I started by painting my nails with the base colours of my chosen polishes, and then added a coat of the gorgeous glitter topper from Claire's. I really love how it looks over the neon green and the lavender. The whole thing still looked unfinished, so I added some floral stamping with MoYou London Mother Nature 02 plate and my trusty Stargazer 232 silver chrome.

I really like the partial coverage stamping achieved with the full image plate from MoYou London
Because Mother Nature plates are all full pattern ones, I was able to stamp different sections of the floral pattern onto my nails, and have the stamps cover only some of my nail.

I will go back to water marbling one day - I'll try different polishes, and maybe I'll settle for making decals from the dried film rather than dunking my fingers right in. But for now, I acknowledge my defeat :)


Polishes I used:
  • Nails Inc York Street - dusty pale blue crème, opaque in two coats and reasonably quick to dry. A bit patchy on the first coat, but completely self-leveling on the second one.
  • Nails Inc Wardour Street - beautiful lavender crème, super easy to apply and opaque in two coats. My new favourite purple.
  • Claire's Shiver- a glitter topper of white and semi-translucent green hexes in a shimmery base that flashes blue, pink and purple. I wasn't able to fully capture the shimmer in the sunlight over the bright undies - but it's there. This glitter is very easy to apply, dries fast and to a slightly rough finish. Great polish from a budget brand!
  • China Glaze Highlight of my Summer - neon mint crème, much brighter than my photos show it to be. It was a nightmare to apply - patchy, streaky and uneven; needed three coats for full opacity and dried uneven. The glitter and top coat solved most of the problems with the finish, so in the end, it's worth the bother.
  • Stargazer 232 - seriously silver chrome, perfect for stamping.
Thanks for looking, and check out other challenge manicures below!


Tuesday, 4 March 2014

Tri-Polish Tuesdays - March round one!

Polishes used: Hits Specialita Apollo, China Glaze When Starts Collide, Lilypad Lacquer Clover all over

 March has come, and with it a new set of colours for the Tri-Polish Tuesdays challenge - my favourite colours, in fact! My stash is filled with green, blue and purple, so I was eagerly awaiting this part of the challenge :D It's still sunny here in Scotland as well, so I whipped out my holos and set to work.
Stamped gradient with green, blue and purple holographic polishes
I started with two coats of Clover all over, a gorgeous cool green holo, and then sponged on a gradient of the deep blue Apollo. These two polishes have a somewhat different holo quality, with Apollo having a finer linear effect, while Clover has larger particles and more sparkle. I then used When Stars Collide to stamp an arabesque floral design from my trusty MoYou London Pro06 plate, and finished it off with Seche Vite.
Holographic gradient and stamping
Unfortunately, while the China Glaze polish stamped well, the transferred pattern had lost a lot of the holographic dust, and ended up looking rather dull in comparison to the base colours. I still love the effect - and just look at it in the sun!

Holographic gradient in the sun - rainbows like whoa!
This was definitely one of the best manicures I've worn, and I got many compliments from my friends.

Polishes I used:
  • Hits Specialita Apollo - intense blue with a holographic finish. I've not worn it alone yet, but it worked wonders for gradient work, and dried very fast.
  • China Glaze When Starts Collide - plum purple with a fine holographic effect. The first coat goes on streaky and draggy, so the second coat needs to sort of glide on - but once it's on, it's a gorgeous polish. Dries fast, stamps well and isn't extinguished by a topcoat.
  • Lilypad Lacquer Clover all over - a beautiful cool green with serious holographic sparkle action. It's a bit sheer, and the first coat looks patchy, but a medium-thick second coat fixes all flaws. Easy to apply, but it took a good while to be fully dry.
Thanks for looking, and check out other challenge manicures below!


Thursday, 27 February 2014

Polish Party Chevrons


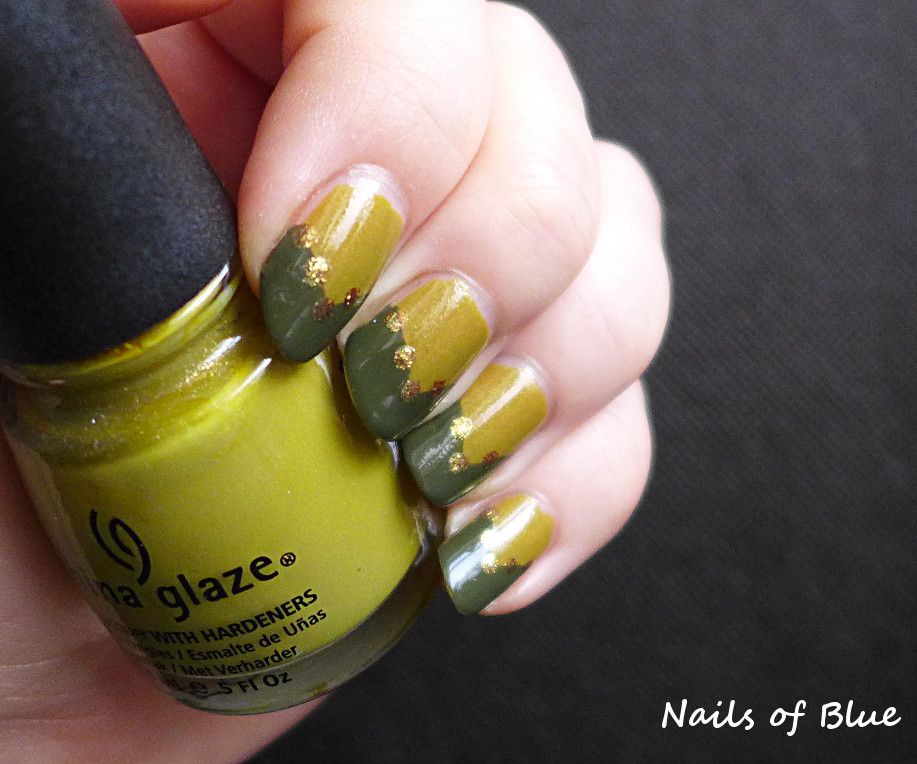
Polishes used: China Glaze Westside Warrior, China Glaze Trendsetter and OPI Goldeneye.

It's the end of the month, and time for a Polish Party! This month, the vote was for chevrons as the main theme for nail art. I'd never done them before, but hey, how hard could it be? Right...?

I picked out two one-coat polishes I had in green and blue, and started by painting my nails with each in turn. I prepared some masking tape, and once my nails were dry, I applied my first chevron pattern. It was a complete fail - the masking tape didn't fully adhere to the nail, and resulted in really jagged ugly lines. One nail ruined, I can deal with that. I took out my striping tape (which I hate using because it's so fiddly and thin), and did a chevron pattern on my second nail. No real luck either - the lines were ok, but the shape was lopsided, and the faffing with the tape took ages. I had to take a break and breathe deeply at this point. Maybe I could sponge it on? Nope. Use a different tape? Nope. Stamp some chevrons? No such plate. In a fit of desperation, I freehanded a chevron with a thin polish brush. Whoa! It actually worked! So I picked two complementing polishes with good opacity and thin brushes, and entered the brave new world of freehand.

Freehanded green dotted chevrons for the Polish Party.
I started with a single medium coat of the mustard green Trendsetter, which is probably my favourite weird colour ever. Once it dried, I freehanded the chevrons with army green Westside Warrior, and finally added a layer of Seche Vite The results were surprisingly good, although I didn't manage to get the lines very straight, or the chevron peaks fully centered. To cover that, I added some Goldeneye dots, cause nothing distracts from shoddy craftsmanship like dots :D

Green dotted chevrons for the Polish Party
I was actually happy with this manicure, largely because I love greens, but also because these were my first freehand nails, and I was determined to enjoy them regardless of any wonkiness. Plus, they look a bit like some military epaulettes, with all that green and gold.

Green dotted chevrons
Polishes I used:
  • China Glaze Westside Warrior - a murky, dark army green crème, with amazing coverage (one careful coat, or two thin ones). It dried fast, and works great for nail art. Did I mention it's green? I love green.
  • China Glaze Trendsetter - a muted, mustard green with a gold shimmer. I guess it could be called ugly, but I love it to bits. It works really well on my skin, is opaque in one coat (or two thin ones) and applies like a dream.
  • OPI Goldeneye - a gorgeous yellow gold shimmer that dries to a foil-like finish, essentially like gilded nails. On its own, opaque in three coats, but it dries fast and is brilliant for dots, the saran wrap technique or sponging. One of my go-to gold polishes for nail art.
Thanks for looking, and check out other Polish Party manicures here:

Saturday, 15 February 2014

Ravishing Romance - a jelly sandwich

My Valentine's manicure inspired me to try wearing more red - and to see what effects I can achieve with the deep red jelly polish I found buried in my stash - China Glaze Ravishing, Dahling. I had bought it months ago at a Sally Express sale for £1.50, and from what I saw recently, it's still available as a bargain on their website.

After some faffing about with a piece of paper and trying out different layering solutions (I usually do it on plain paper in my notebook), I ended up with a duo of Essence Time for Romance and China Glaze Ravishing, Dahling.

Here are the results!

Jelly sandwich with Essence Time for Romance and China Glaze Ravishing, Dahling.

I used a single coat of Time for Romance as the base. It wasn't opaque, but considering I was going to cover it with a fairly dark jelly, the lack of full coverage was not an issue. Additionally, I didn't want to layer the glitter too much to make removal a bit easier. You can see the bottle look of Time for Romance in the photograph below.

Jelly sandwich with Essence Time for Romance and China Glaze Ravishing, Dahling.
I then covered the dry glitter with a medium coat of China Glaze Ravishing, Dahling. The pink-leaning wine jelly is very manageable, and there were no issues with streakiness, at least over the busy glitter background. I had once layered it over white, and it was much harder to get the uniform colour dictribution.

Jelly sandwich with Essence Time for Romance and China Glaze Ravishing, Dahling.
The jelly layer smoothed out the glitter on it's own pretty well, so a single generous coat of Seche Vite was enough to ensure a smooth glossy finish. The end result was simply magnificent - like rubies drowned in syrup, or cherry jello. I don't happen to own any polishes even remotely close to this effect, but I guess China Glaze Ruby Pumps would be in the general ballpark. And with Ravishing, Dahling I have full control over the glitter I use underneath, which makes it a very versatile solution. I need to try it out over a glitter gradient next!


Polishes I used:
  • Essence Time for Romance - a dusky rose glitter of various sizes in a tinted base. On its own it would be fully opaque in three coats, although it would be fairly lumpy by then. The Essence brush is very wide, and slightly unwieldy, especially when bits of glitter get stuck between the bristles and fluff it up too much. The glitter removal is hard, and the foil method is definitely recommended.
  • China Glaze Ravishing, Dahling - a pink-leaning red wine jelly, perfect for layering. It would be opaque on its own in three coats. Fairly easy to apply, although I found that for me the narrow China Glaze brush doesn't really lend itself to clean cuticle lines. The one serious minus is that it stains the cuticles, and is very hard to clean up - my hands looked a bit mangled, as I wasn't able to fully fix all the staining.


Thanks for looking!

Thursday, 6 February 2014

FingerFood's Theme Weeks - Brithdays/Celebrations

Supplies used in this post - China Glaze For Audrey, H&M Green Bluish and Andrea Fullerton Nail Jewels.
Another first manicure in a new nail challenge! FingerFood's Theme Weeks is a one-weekly challenge that assigns a certain visual theme or an idea. This week it's birthdays or other celebrations. I was in a bit of a pickle here, since I have no appropriate stamping plates, and my freehand is atrocious. Luckily, my eyes fell on my China Glaze stash, and inspiration struck. You see, about a month ago my best friend was having a unicorn-themed birthday party, and I made her unicorn poop cupcakes, covered in light blue frosting, silver pearls, and edible shimmer. For Audrey happens to closely match the colour on that delicious frosting - then it was simply a case of finding some matching sparkles!
I recently went into H&M, and found some great glitters from both core and seasonal collections, and being who I am, Green Bluish caught my eye immediately. And look at the cutest little bottle it's in! The red blob reflected in the cap is me taking a photo :D

China Glaze For Audrey, with H&M Green Bluish on the ring finger, and one gem on the others.
This is the first time I've ever used nail gems - I got three packs of them in Superdrug on a sale. It looks like Andrea Fullerton is discontinuing at least some of their lines, and I was able to pick these beauties up for 80p per pack. Go and see if they're still there, if you can! I also got gold round studs, and a jewel-toned gem pack. This particular set is iridescent, with a purple and gold flash, but I wasn't really able to capture their sparkle on my camera. Perhaps if it was sunny here...

Birthday/Celebration manicure, with China Glaze For Audrey and H&M Green Bluish
I had no problems with getting the gems onto my nails, since the box came with a tiny rubber ended gem picker. I smothered them with Seche Vite, but I am not holding my breath for how long they will survive on my nails. Still, it's great for celebrations!

Polishes used:
  • China Glaze For Audrey - Duck egg crème, opaque in two careful coats. This is the runniest polish I own, and it was a bit of a bother to apply without flooding the cuticles. I would recommend laying the first coat thin, as a thicker second coat seems happy to stay within the borders of the first one.
  • H&M Green Bluish - a super pretty glitter in a clear base. It's a mix of sparse large silver hexes and smaller blue and green iridescent hexes in two sizes. I had to fish a bit for the silver hexes, and overall it's not a full coverage glitter. It dries fast, and would probably look amazing over dark colours as well.
Thanks for looking!

Here are some of the other challenge manicures: