Saturday, 26 April 2014

The NPC - Had to have it...


I am late again - but I am so happy with what I have on my nails right now! I bought Gravity a few months ago, but because I also snatched a bottle of Aurora, I hadn't worn Gravity yet. So, for this manicure I went with it - but instead of layering it over black (as I did on my swatch stick), I went with a dark purple base. The effect is interesting, although I have to say the multi-chrome pops better over black. In future, I think I will try it over green just to see how it works!


Picture Polish Gravity with Stargazer 232 stamping, using Vivid Lacquer plates
I used two coats over a coat of Misa Sorry Just Can't Help It, sealed it with Butter London Hardwear top coat (which is seriously amazing!) and once everything was dry, I stamped the moon and the bats with my favourite Stargazer 232 silver foil. The plate I used was Vivid Lacquer VL-013.

A starry sky just after sunset, a full moon and some bats - just screams spring, right?
I really love how Gravity looks just like the night sky.

Thanks for looking, and check out other untrieds below!


Thursday, 24 April 2014

The Neverending Pile Challenge - Boutique

Oh man, I am late with this one! And only one photo - but life is super hectic now, and I barely have time to paint my nails, let alone photograph, process and write about them!

Butter London No More Waity, Katie and Born Pretty Store water decals
I don't own many boutique polishes - and they are all from TK Max! This is a fairly recent addition that I hunter there, along with a top coat and base coat set. I must say the Nail Foundation is amazing, and so is the Hardwear top coat. The polish itself was opaque in two coats, and is a combination of two shades I like - taupe base and lavender glitter. To make it more interesting, I used feather water decals for Born Pretty Store. They were an absolute breeze to use - cut out, drop in some water, slide off the paper and onto the nail, pat dry and top coat! I will definitely be using decals more often.

Thanks for looking!


Tuesday, 22 April 2014

Tri-Polish Challenge April week 4!

Is this the final week of April? It seems that this month we will have 5 manicures, as the next Tuesday is still the 29th of April! Luckily I am liking this month's colour set :)

Polishes used: Wibo Baltic Sand 03, Spoiled Designated Driver and Spoiled Fuzzy Dice.
This time, I went with a gradient manicure for a change. I had picked up the two Spoiled polishes for a pound in Poundland, and they were just perfect for the job. I initially tried to add some blue glitter as an accent, but that looked horrible, so I just slapped on some textured polish and called it a day. Busy times!

Tropical gradient, and a textured blue sky - all that's missing are palm trees!
I started with three coats of Designated Driver - a  gorgeous warm yellow polish. It went on like a dream - no streaking, no patchiness, and completely glossy and self-leveling. The best 50p ever spent! I then sponged the pink Fuzzy Dice onto the tips, trying for a smooth gradient effect. I rarely go for such contrasting gradients, and I never mix polishes before painting them onto the sponge, so my success was limited. Nonetheless, it looked amazing from a distance of more than 50cm, so I call it a win.


Wibo Baltic Sand 03 is a Polish polish (hah!) that I brought back from my visit there, and it's one of the prettiest textures I own. It teeters on the line between blue and aqua, and is full of silver shimmer and glitter. The shade itself should have probably been a bit more saturated to pass for a tropical lagoon, but it still matched the gradient quite well. All in all, it was a pleasant return to gradients!

Thanks for looking, and check out other manicures below!


Sunday, 20 April 2014

FingerFood's Theme Weeks - Gothic

Another week, another FingerFood theme! This is a manicure that I did, photographed, removed, thought it was ugly... but when I came back to the photos now, I actually like it! Which is good, since I don't have time to do any other manicure for this challenge!


Polishes used: Nails Inc Little Chester Street, Maybelline Woven Skyline, OPI Off With Her Red, Jess Rock Chick, China Glaze Ravishing, Dahling, Color Club Red Velvet, Nails Inc Burton Mews and Barry M Superdrug LE2013.

As you can see I went overboard with the number of polishes used - and because of my limited time, I can't really explain in detail how I did it.

Gothic manicure - roses, jelly and glitter!


I basically used the different glitters, and the red jelly to create the plainer nails, and painted roses on the middle finger with an assortment of red and green polishes.

Glitter under jelly is one of my favourite things.
Thanks for looking, and check out other manicures below!


Friday, 18 April 2014

Neverending Pile Challenge - Indie

Due to a super busy schedule, I am cutting down on the amount of text - let the image(s) so the talking!

I had a candidate for the Indie prompt for a while - I got a bottle of Polish Me Silly Chill Out a while back, but since I had bought it alongside Picture Polish Aurora, it was just sitting in the drawer, sulking. Well, sulk no more!

Polish Me Silly Chill Out over Misa I Will Survive
To do some nail art for this post, I started with a coat of my favourite black - Misa I will Survive, and then sponged on the duochrome polish on the tips. The full accent nail has also been sponged on, as I found it helps with all brush strokes (not that it's frosty, but I already had it on the sponge...). I tried for a while, but just couldn't capture how Chill Out shifts - it goes from teal to sky blue to purple and pink, and at certain angles comes alive with red sparkles!


Thanks for looking, and check out other newly tried Indies!


Wednesday, 16 April 2014

The Neverending Pile Challenge - Jelly

I had to really dig into my coffers before I found a handful of jellies - but in the end I settled on a gorgeous purple beauty that I'd never worn before!

Polishes used: Color Club Savoy Nights and Revlon Grape Fizz
I picked up Grape Fizz from a bargain store, and while I'd tried it out on a swatch stick, and on paper, I'd never worn this glass-flecked jelly. Alone, it's very sheer, and would probably take 4 coats to be opaque - but that's what makes it perfect for sandwiches! It also smells of artificial grapes - honestly it's a bit too sweet for me :D

Grape Fizz Jelly glitter sandwich
I paired the jelly with an untried silvery-blue glitter from Color Club - Savoy Nights. It's a full coverage glitter with large and tiny silver-blue hexes in a lightly tinted base - and here you see a single coat of it! I applied a coat of Grape Fizz, a coat of Savoy Nights and then two coats of Grape Fizz again.

Fizzy and delicious?
I have to admit I love the depth the purple jelly gives to this glitter. I was not really fond of Savoy Nights, but this has been a lovely manicure to wear. And that's two untrieds vanquished!

Thanks for looking, and check out other jellies below!


Tuesday, 15 April 2014

Tri-Polish Tuesday - April round 3!

Another Tuesday, another Tri-Polish Challenge awaiting. This week is super busy for me - and so will the next few, so I will let the pictures do the talking.

Polishes used: Barry M Cyan, Rimmel Sunshine, Spoiled Fuzzy Dice, Misa I Will Survive
Being pressed for time and inspiration, I went with my staple dotticure. This time I used a black background to make the bright colours pop - but it turned out that the yellow and pink needed two 'dabs' to actually be as bright as over white. Next time I might start with white dots as a base.

Semi-random dotticure
I started with a pink dot on each nail, and used the blue polish to create dotted spirals leading away from it. I then filled the gaps with yellow dots, vaguely trying to follow a spiral shape as well. Once everything was dry, I secured it all with Color Club fast drying top coat.

Yellow, blue and pink dots
Thanks for looking, and check out other TPC manicures below!


Monday, 14 April 2014

The Neverending Pile Challenge - Frost

This was a proper challenge prompt - I hate frosty polishes. I can deal with some brush-strokes, but the true frosty look is awful. Hence, it took me a while to figure out what atrocious polishes I own, and then what to do with them. In the end, I chickened out and used a technique that eliminates the frostiness altogether :D

Polishes used: Revlon Varnished, Orly Shimmering Mauve and Color Club Masquerading.
I started with two coats of the fairly frosty Color Club Masquerading. Once that was dry, I used a small piece of a make-up sponge to add random bits of Revlon Varnished. Alone, and applied with a brush Varnished is probably the king of awful polished - runny, incredibly brush-strokey and with a tendency to separate even in the brush!

Distressed sponged nails - a much better use of frosty nail polish!
Once that was dry, I added blobs of Orly Shimmering Mauve, which alone is ugly and frosty. Here it imitated rust pretty well. Finally, I went over it with some more Masquerading to darken the areas I was too heavy with the sponging. Once everything was dry, I secured it all with Seche Vite.

Metal, rust and dirt
This manicure took 10 minutes to do, and I got quite a few compliments for it. And during it, I learned that the two polishes I really hated - Varnished and Shimmering Mauve are actually pretty OK when sponged on. So if you have a frosty polish just grab that sponge and see if you can turn it into a beauty!

Thanks for looking and check out other manicures below!


Sunday, 13 April 2014

FingerFood's Theme Weeks - Fishtail

This week's theme is a technique I had never tried before - a fishtail braid. This is why I love challenges - they make me attempt things I'd never dare without the prompt!

Polishes used: China Glaze Spontaneous, Jess Disco Diva, my own franken, Misa Sorry Just Can't Help It and Star Gazer 232
I started with the plainer nails, and did the actual fishtail a day later. The base colour is one of my own franken-polishes - I had a bottle of very runny silver microglitter polish (which came with a striping brush, completely unsuited to the polish), and I poured it into a larger bottle and added some purple and grey polish until I got the colour I wanted. I may still tweak it in the future, but right now it's a lovely dusty lavender with insane amounts of silver microglitter and two coat coverage. Once this was dry, I added a glitter gradient of Jess Disco Diva on the tips. The effect screamed Disney princess to me :D

Fishtail braid manicure with a franken-polish of my own
The next day I sat down with a podcast, and started the time consuming process of painting the braid. Seriously, I had to wait for each individual stripe to dry - it took me at least 30 minutes in total. I picked out three polishes that would compliment the base - two purples and a silver foil - and followed the tutorial by the amazing Lucy from Lucy's Stash. It took me a while to figure out the best brush to use for this - the bottle brushes were too big, the detail brush too small, and in the end I went with a striping brush. Once the whole thing was dry, I secured it with Color Club top coat.

Glitter and fishtail braid.
As you can see, the fishtail is not very neat, and leans off-centre. However, I am quite happy with it - it was my first go at this technique. The polishes I chose were perfect for the job, opaque and easily applied, and the striping brush worked well. I will probably use this technique again in the future, but only as an accent nail - I don't think I have the patience to do an entire hand!

Polishes I used:
  • China Glaze Spontaneous - an almost pastel medium purple crème, nicely opaque (two coats alone) and very easy to apply.
  • Jess Disco Diva - a mix of two sizes of purple and holographic glitter in a clear base. Swatched here.
  • Misa Sorry Just Can't Help It - a darker saturated purple crème, excellent for nail art and nearly a one coater on its own. 
  • Star Gazer 232 - incredibly opaque silver foil, perfect for all nail art purposes.
  • My own franken - so far nameless, and obviously unique!


Thanks for looking, and check out other challenge manicures below!

Friday, 11 April 2014

The Neverending Pile Challenge - Random Untried

For the random untried challenge today I picked out a polish duo I got a while back from Sally Magpie's - Essence Ticket to the Show and Front Row or Backstage? It's been hanging around in my drawer, looking all sad, and despite the sunny weather I was feeling up for something dark and vampy.

Essence Ticket to the Show with a gradient of Front Row or Backstage.
I started with two coats of Ticket to the Show - a black base with gold and red shimmer. It was very easy to apply, and very sparkly in sunlight. Once that was dry, I used a sponge to add a gradient of Front Row or Backstage? - a bronze-gold shimmer in a smokey translucent base. Finally, I added two bronze studs from the Andrea Fullerton line, and covered it all with Seche Vite.

You can see the sparkle in the sunlight.
I love glitter gradients - they are so simple to do, and look really well.

Thanks for looking, and check out other random untrieds below!


Thursday, 10 April 2014

FingerFood's Theme Weeks - Delicious!

I've had this manicure ready for a while now, but I just couldn't find the time to edit the photos and write the post. But finally, here it is!

Polishes used: OPI Off With Her Red and NYC High Line Green
 
I had actually proposed the 'Delicious' theme myself, but when it came to it, I had to really think about what I could do with my nails. Pie? Chocolate drips? Cupcakes? In the end, I went with a simple yet genius technique developed by Chalkboard Nails - embossing dimples in the still plastic nail varnish to create a 'perforated' effect. And what else is dimpled like that? Strawberries!

Strawberry nails
I started with two thick layers of OPI Off With Her Red, and the quickly added a generous layer of Color Club quick drying top coat.  When this was touch-dry (but still squishy underneath), I used a small dotting tool to impress the tiny dimples into the polish. I found that I had to go over some spots, since the polish would rebound - but overall this was a super easy process!

Delicious strawberry nails - nom!
After the red part was dry, I used a thin detailing brush to pain the green leaves with NYC High Line Green. I didn't worry about getting them accurate - just that they look cute. Overall, this was such a fun manicure to do - simple and super effective!


Thanks for looking, and check out other delicious manicures below!


Wednesday, 9 April 2014

The Neverending Pile Challenge - Glitter and Pastel

I like challenges - they make me think outside the box, and help me with posting regularly. Recently, I came across a challenge that is based on using untried polishes from my stash, and I thought it's the perfect challenge for me. While my stash is not as massive as some, I do have a fair share of polishes I just had to buy, but didn't have the time or inspiration to use.


I only came across this yesterday, so in today's post I am combining the first two prompts into a simple manicure. I started by picking out a pastel I bought two months ago, but didn't use yet - Sally Hansen Palm Treat.

Sally Hansen Palm Treat, no topcoat.
It's a very pretty pale green with no hints of blue - I have many mint polishes, but this one is unique! It's also super easy to apply and fully opaque in two coats. I then topped it off with a glitter I bought a few months ago and again, haven't even swatched on a stick: Maybelline White Splash.

Maybelline Street Artist White Splash
White splash is a mix of matte white and metallic blue, green and purple glitter in hexes and bars. The bars are very long, and I don't really like them very much, but the overall effect on the green background is very pretty - makes me think of spring. The sky was overcast when I was taking the photos, so they don't really show off how bright the combination really is.

Thanks for looking, and check out other manicures in the challenge below!


Tuesday, 8 April 2014

Tri-Polish Tuesday - April week 2

This has been quite a busy weekend for me, and the camping trip means I am a bit behind in the posting schedule. It's been hell on my nails as well, so I apologise in advance for my fingers!

Polishes Used: Ciate Main Stage, Color Club Poetic Hues and Barry M Cyan.
This week my new Vivid Lacquer stamping plates have arrived, so I decided to play around with them for the challenge. While I have a few stamping polishes I am confident using, I always try to find out what else I can use for stamping. After some experiments, I decided on two very opaque and saturated crèmes - Cyan and Main Stage. Both of these stamp well over pale backgrounds (as I found out when I tried a different colour configuration), so I decided to use the pale peach/yellow Poetic Hues as my base.

Stamping with Vivid Lacquer 019 plate.
 I started with two coats of Poetic Hues, and once these were dry I used the blue and pink polishes with the Vivid Lacquer plate number 019. I still seem to have random problems with stamping - sometimes it works perfectly, sometimes the design breaks a bit on my nail.

Blue and pink stamping.
The Vivid Lacquer plates are great - the designs are beautiful and fun, and large enough to cover my entire thumb with space to spare. Some designs work better with thinner polishes, especially the ones with a lot of tiny details - so if something isn't working, don't give up and try a different polish.

Polishes I used:
  • Ciate Main Stage - an eye-catching saturated berry pink crème, one of the few pinks I like! Very opaque (two coats alone), with a creamy consistency and excellent application.
  • Color Club Poetic Hues - peach leaning off-white crème, opaque in two coats and great as a base for nail art. The first coat is a bit uneven, but a thick second one solves any issues.
  • Barry M Cyan - intense blue crème, opaque in a single coat and easy to apply. Very good for stamping over lighter colours.
Thanks for looking and check out other TPC manicures below!

Saturday, 5 April 2014

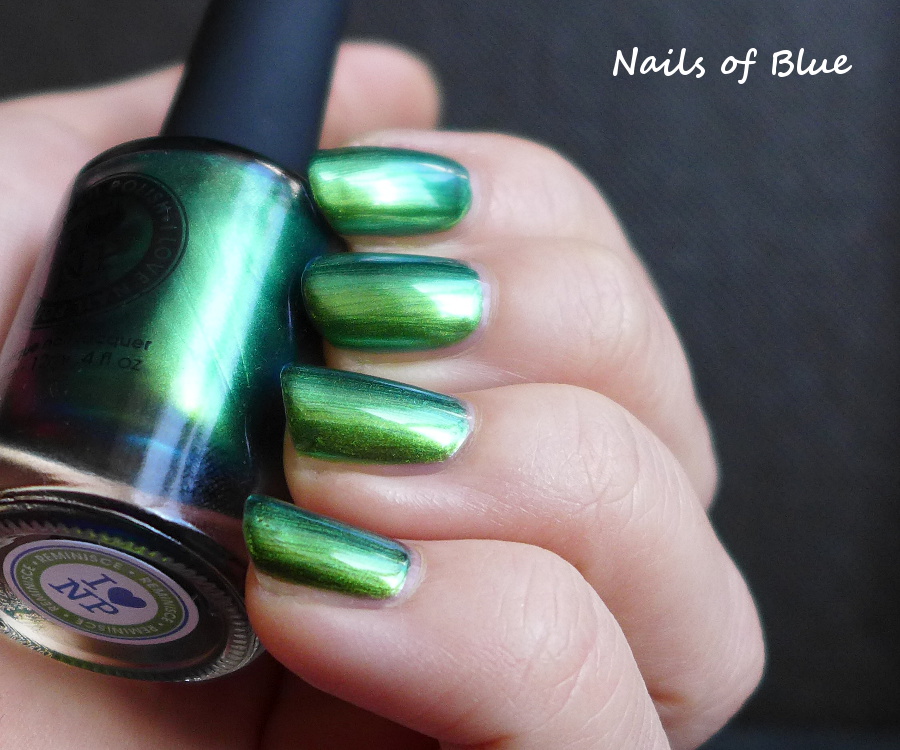
ILNP Reminisce swatch & nail art

Today I want to show you my second I Love Nail Polish colour - Reminisce. I've been hunting for a polish like this for a while because it looks just like beetle wings. I have a pair of earrings made with these, and I love the amazing green/blue/purple/gold colour shift on the chitin.

ILNO - Reminisce in natural daylight, with top coat.
This polish is simply stunning - opaque in two coats with no need for black undies, and much more colour shifting than I managed to catch in my photos! Due to where my light source (i.e. the window) is located, I couldn't capture the blue shift - but it's there and it's very strong indeed!


This polish was such a treat to wear! However, I chipped it pretty soon during drumming. Instead of removing it, I patched it a bit and then created an impromptu Hulk manicure by layering over it with OPI Superbass shatter. It looks like Hulk is ripping through his purple pants :D

Hulk smash!

Thanks for looking, and check out what other British Bloggers have been up to this week!


Thursday, 3 April 2014

Golden Oldies Thursday - Pastels

I seem to be perpetually stumped for GOT challenges - it might be because my old polishes are often boring! This week's prompt was also difficult - I used to hate pastel colours, and never bought them until quite late in my collecting career. Hence, I only had one candidate for this manicure - Sally Hansen Loyal Lavender.

Polishes used: Sally Hansen Loyal Lavender and OPI Alpine Snow, stamped with MoYou London Sailor 06

Do you know those bad hair days, where no matter what you do your hair looks horrid? I was definitely having a bad nail day when I took this - the stamping was muddled, the base had shrunk and my cuticles suddenly dried up like the Sahara. And yet, here it is - my first effort at stamping with a white nail polish. I promise, the next manicure will be much nicer :)

 Polishes used: 
  • Sally Hansen Loyal Lavender - a pale lavender base with an intense violet shimmer. It's lovely on the nail, and applies like a dream in two easy coats. Quite an achievement for a pastel!
  • OPI Alpine Snow - a white crème polish, and in my hands, not ideal for stamping with. It's great for other nail art purposes though!

Thanks for looking, and check out other GOT manicures below!


Tuesday, 1 April 2014

Tri-Polish Challenge - April week 1

This month's Tri-Polish challenge brings us new colours - blue, yellow and pink. It's such a summery combination! Blue sunny skies and pink flowers, that's what I'm thinking. This week I went for something simpler, and returned to my staple technique - dotting.

Polishes used: Nails Inc Sumner Place, Orly Snowcone and Ciate Candy Floss
 
For this manicure I started with a base of the pale yellow Sumner Place, which is one of the few yellows I can deal with applying. I then took my largest dotting tool and added semi-random dots of the blue Snowcone close to the free edge, and some smaller ones closer to the nail bed.I then did the same thing using the pink Candy Floss, filling in the gaps I left. Once everything was dry, I used a coat of Seche Vite to keep it all safe.

Summery dotticure - looks like bubbles!


This was a super-easy manicure, and I must say the effect is so much better than I had expected. I was a bit stumped for this challenge, but I guess dots are always the answer to everything :D

Polishes I used:
  • Nails Inc Sumner Place - pale yellow crème, opaque in 2-3 medium coats. It's quite manageable for a yellow polish, it's a bit streaky in the first two coats, but the third one fixes most of the problems. I wouldn't wear yellow as a main colour, but it's actually pretty sweet as a base for nail art.
  • Orly Snowcone- dusty pale blue crème that leans a bit towards the periwinkle side of blue. Nicely opaque and super easy to apply, on its own it's nearly a one coater. What a gorgeous colour!
  • Ciate Candy Floss - pastel pink crème with a touch of dustiness. Like all my Ciate crèmes, it's a treat to apply, and would be opaque in two easy coats.

Thanks for looking, and  check out other challenge manicures below!

Blue manicure for Autism Awareness

April is autism awareness month, and I've joined the Paint it Blue initiative. While I'm not sure how much actions like these spread awareness, I am very much interested in autism - I teach psychology, and the topic of what exactly happens during the development in autistic children is a fascinating one.

So, let's start with a basic intro! This will only cover the basics of what autism is and the symptoms. If I were to write about the exact cognitive and developmental issues, or the brain correlates of autism, I would write a book and still not address everything.

Autism is classed by the DSM-IV as a pervasive developmental disorder - this means that problems arise in the developmental process itself, and the child's development is not delayed, but atypical. Autism is one of the five disorders grouped under that heading, alongside Asperger's disorder and  Rett's syndrome. The main features of autism are the presence of markedly abnormal or impaired development in social interaction and communication and a markedly restricted repertoire of activity and interests, which include repetitive and stereotyped behaviours. This is often presented as a 'triad of impairments' in social interaction, communication and behaviour patterns. However, the individual presentation of these problems can be very varied, and different children can present with markedly different symptom and behaviours.This variability has contributed to the use of the 'autistic spectrum' term, which is better at describing the different levels of functioning and impairment children and adults with autism can present.

The first identifiable signs of autism start appearing around the second year of infant's life, but there is evidence that the brain differences that give rise to autistic behaviour are formed in the second trimester of pregnancy. The usual signs are lack of eye contact and smiling, lack of engagement with toys, especially for pretend play, or excessive attachment to a single toy. Children that develop autism usually don't point to objects, rarely babble and are generally impaired in their language skills and corresponding social skills. Children can also show various hypersensitivities - to sound, to touch and to light, and are attached to routines. Later in development, people with autism show a very literal approach to language and often describe themselves as thinking in pictures rather than words. If you're interested in an autistic person's perspective, head over to Temple Grandin's page!

The current prevalence rate of autistic spectrum disorders (including Asperger's) has been estimated at one in 88, and there is considerable debate about whether the increase in diagnosis is due to an actual increase in incidence, or due to different approach to diagnosis and a widening of the diagnostic criteria. If this is something that interest you, I can recommend this Science Based Medicine post.

The manicure is more of a post script to this, so I won't post the usual details on how it was done. It's here for a different reason.


Blue skittlette for Autism Awareness.

Polishes used: A-England Order of the Garter, OPI Pure, Color Club Sexy Siren and Stargazer 232

Thanks for reading!

Monday, 31 March 2014

Polish Party - Spring

This is a very busy end of the month for me - a blog post pretty much every day, and so much to do at home as well! For this month's Polish Party theme I decided to recreate a manicure by Fia that I saw on G+.

Polishes used: Color Club Lady Holiday, Barry M Key Lime Gelly and Nails Inc Burton Mews

I was unsure about the background colour at first, and was leaning towards a pale nude pink, but in the end the foggy weather we've had here for the past three days made me go with a grey colour that matches the sky and the stones.

Outlined leaves on a foggy sky.


I started with two coats of Color Club Lady Holiday, and once they were dry, I used my detail brush to draw on the leaf bobs with Key Lime Gelly. It was fairly thick, so while it provided good coverage, it was also a bit fiddly to apply - it may be in need of a few drops of polish thinner. Once the leaves were dry, I added the outlines and stems with the dark green Burton Mews.

Leafy tips
This was much trickier than I thought - getting the stems and veins right with my detailing brush required precision I'm still not in full possession of, and my end result is nowhere near as tidy as my inspiration. But it was a fun manicure to do, and the messiness of my lines was not visible in normal wear. I even got a few compliments for this manicure!

Polishes I used:
  • Color Club Lady Holiday - a warm-leaning pale grey crème, opaque in two easy coats. An excellent staple for nail art.
  • Barry M Key Lime Gelly - a saturated warm green crème, fairly thick in consistency and opaque in two coats. Because of its thickness, it can get a bit draggy when it starts to dry. But it's such a beautiful bright green, I cannot hold a grudge against it.
  • Nails Inc Burton Mews - a dark green crème, opaque in two coats and perfect for nail art.

Thanks for looking, and check out other Polish Party manicures below.

Sunday, 30 March 2014

FingerFood's Theme Weeks - Monochrome Mother's Day!

This week we have a bumper crop of themes! Due to an overlap between an old and a new set of prompts, I could combine two ideas - one for Mothers' Day and a Monochrome one. Challenge accepted!

Polishes used: Revlon Guest List, Color Club Nouveau Vintage and Sugar Ray, Ciate Cookies & Cream, Nails Inc Langham Place and OPI You Don't Know Jacques

When I was still planning for the single theme of Mothers Day, I decided I wanted to finally try my hand at freehanded vintage roses. I've always loved how they look, and the instructions were simple enough - and so many amazing bloggers posted excellent tutorials! For this manicure, I followed the advice of the incredible Nailasaurus. The addiction of the monochrome prompt forced me to consider a few colour options, and after some deliberation (and a whole lot of polish dots on paper) I chose sepia as my main colour scheme.

Vintage sepia roses and dots.
I started by painting my index and ring fingers with two coats of Color Club Nouveau Vintage - a brown polish with a strong gold and green shimmer. The thumb, middle and pinky were covered with two coats of Color Club Sugar Ray - a pale nude with a fine pink shimmer.

The dots were added with a medium dotting tool. The centre row is Noveau Vintage, the next one outwards is Nails Inc Langham Place, and the out-most row is OPI You Don't Know Jacques. For the roses, I blobbed the Langham Place as the base with the dotting tool, and then added the shadows and highlights with a fine detailing brush from Born Pretty Store using You Don't Know Jacques and Ciate Cookies and Cream. The leaves are the only departure from the sepia tone, but I wanted to add a bit of contrast to the whole design. These were made with the detail brush and Revlon Guest List. After everything was properly dry, I added one coat of Seche Vite.

Vintage roses and dots.
This manicure was surprisingly easy to do. I had practised the drawing technique a few times on a bit of paper, and then recreated it on my nails. Getting the dots even was probably the hardest part of this manicure! I am completely in love with it right now - it looks gorgeous, and I will definitely be adding roses to my nail art arsenal.

Polishes I used: 
  • Revlon Guest List - a muted khaki green crème. A bit runny in application, but it's opaque in two coats.
  • Color Club Nouveau Vintage - a gorgeous multidimensional gold and olive shimmer in a brown base. Opaque in two coats, easy to apply and did I mention it's beautiful?
  • Color Club Sugar Ray - a pale nude with a fine pink shimmer throughout. Opaque in two easy coats, but it dries a bit frosty - not noticeable under nail art, but it would bother me on its own.
  • Ciate Cookies & Cream - a pink-leaning nude crème, transparent and opaque at the same time. A wonderful polish for nail art base, or details.
  • Nails Inc Langham Place - a warm darkish nude crème, nicely opaque and easy to apply.
  • OPI You Don't Know Jacques - the legendary taupe crème, perfect for nail art. On its own opaque in two easy coats, super easy to apply and incredibly versatile.

Thanks for looking, and check out other theme manicures below!